Garbage Disposal Installation in Dupont, CO
Upgrading or installing a garbage disposal in your Dupont, CO home improves kitchen convenience and reduces sink clogs—but only when the unit, plumbing, and electrical are installed correctly. This page covers what to expect from a professional garbage disposal installation in Dupont, CO: assessment, model selection guidance, plumbing and electrical requirements, step-by-step installation, safety checks, removal and disposal of the old unit, warranty details, and realistic costs and timelines. Use this to make an informed decision and understand the value of a quality installation.
Why proper installation matters in Dupont, CO
Homes in northern Colorado face specific factors that affect kitchen plumbing and appliances. Mineral-rich water can accelerate buildup in disposals and sink drains. Some properties are on septic systems, which require different disposal models or usage habits. Winters can create tighter working windows for exterior plumbing work and make timely service important. A correct installation prevents leaks, electrical hazards, and premature equipment failure.
Common garbage disposal issues and why a professional assessment helps
When considering installation or replacement, technicians evaluate likely problems and site-specific needs:
- Sink compatibility: single- or double-bowl sinks need different mounting hardware and clearance.
- Under-sink space: presence of water filtration, hot water recirculation, or gas lines can limit options.
- Plumbing layout: trap style, dishwasher connection, and trap arm slope affect installation.
- Electrical readiness: availability of an outlet, existing switch location, or need for hardwiring and code-compliant protection (GFCI considerations).
- Septic vs. municipal sewer: septic homes often require smaller, septic-safe disposals and usage guidance.
- Condition of existing flange and drain: corroded or damaged flanges must be replaced to prevent leaks.
Choosing the right model for Dupont homes
Model selection depends on household size, types of food waste, and local factors:
- 1/3 to 1/2 HP: Good for light use, small households, and septic systems where less grinding is preferred.
- 3/4 HP: A common choice for families; handles most food scraps with fewer jams.
- 1 HP and above: Best for large households or heavy food scrap loads; more durable and quieter.
- Features to consider: sound insulation, stainless steel grind components (better for mineral-rich water), continuous vs. batch feed, and manufacturer warranties.
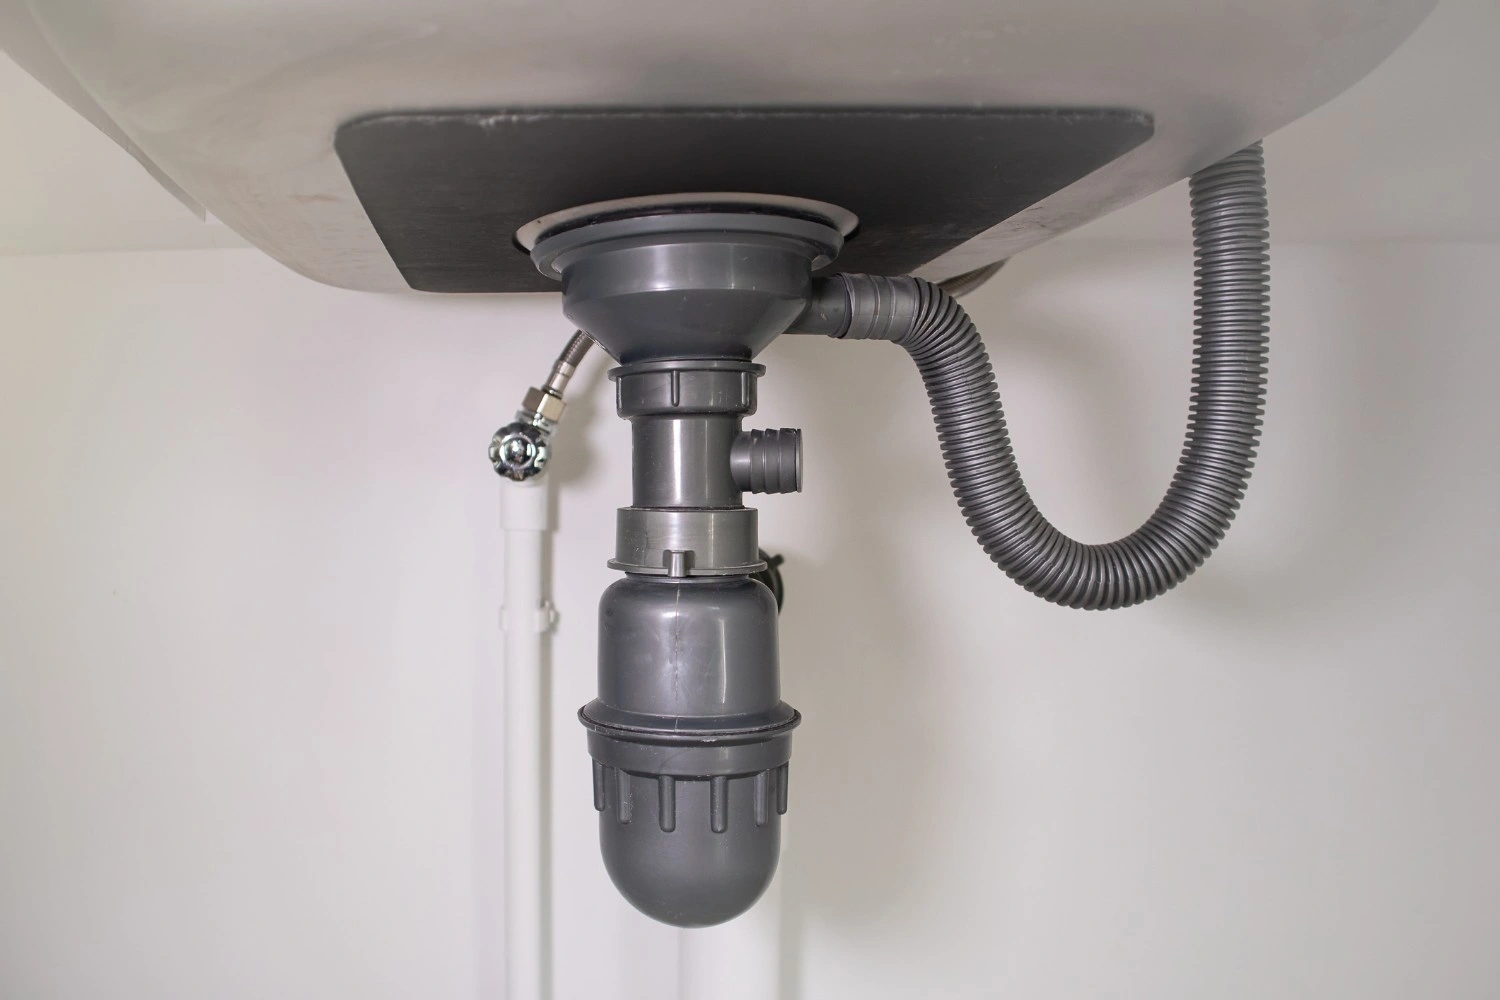
Plumbing and electrical requirements (what the technician checks and prepares)
Plumbing
- Proper sink flange and mounting assembly compatible with the disposal.
- Correct trap configuration and a dishwasher inlet or air gap if needed.
- Adequate trap arm slope to prevent backups.
- Inspect for corroded piping that should be replaced during installation.
Electrical
- 120V circuit with an accessible outlet under the sink or the need to hardwire the unit.
- Appropriate switch location and wiring; some installs require running a new cable or adding a dedicated circuit depending on local code and load.
- Verification of GFCI requirements and compliance with local electrical code.
Septic system considerations
- Recommend septic-safe disposals or usage practices (e.g., reduced organic load) to avoid overloading the system.
Step-by-step installation process
- Assessment and measurements: Confirm unit size, sink mounting type, and under-sink clearance.
- Power isolation: Turn off power at the breaker if working on existing wiring.
- Remove old disposal (if replacing): Disconnect and remove unit, drain residual water, and inspect flange and drain.
- Install sink flange and mounting assembly: Ensure watertight seal with plumber’s putty or recommended gasket.
- Attach disposal and align: Mount following manufacturer instructions; secure locking ring or bolts.
- Connect drain and dishwasher line: Reconnect trap, trap arm, and dishwasher inlet (capped if not used).
- Make electrical connections: Plug into outlet or hardwire per code; install or connect wall switch.
- Test for leaks and proper operation: Run water, operate disposal, check for vibrations, leaks, and proper draining.
- Final safety checks: Verify switch operation, test reset switch, and ensure no exposed wiring.
- Clean up and explain operation: Remove old unit and debris, demonstrate reset and safe operation points.
Safety checks and best practices performed at install
- Confirm grounding and secure electrical connections.
- Verify proper torque and alignment to prevent vibration and noise.
- Ensure dishwasher connection has a high loop or air gap to prevent cross-contamination.
- Test reset and overload protection; explain choking hazards and lockout procedures.
- Inspect for water leaks and re-tighten seals after a short test run.
Disposal of the old unit
Old disposals are handled responsibly:
- Evaluate for recycling options (metal components).
- Drain and remove hazardous residues safely.
- Dispose of non-recyclable parts according to local waste guidelines.
Technicians typically remove the unit from the home and take it for proper disposal or recycling when available.
Warranty and coverage expectations
- Manufacturer warranty: Most disposals include a parts warranty that ranges from 1 year to 10 years depending on model and brand; this covers defects in materials and workmanship.
- Labor/installation warranty: Professional installation often includes a labor warranty that covers installation-related failures for a specified period (commonly 1 year). Keep proof of professional installation to preserve manufacturer warranty in some cases.
- What warranties usually do not cover: misuse (e.g., non-approved materials), clogged drains unrelated to unit failure, or corrosion from improper water chemistry.
Estimated costs and timelines
- Assessment and model guidance: Typical assessment visit and quote can be completed in under an hour.
- Installation timeline:
- New unit in a prepared sink: 1 to 2 hours.
- Replacement with flange or electrical upgrades: 2 to 4 hours.
- Complex plumbing or electrical work may extend to a full day.
- Estimated cost ranges (varies by brand, horsepower, complexity, and local labor rates):
- Disposal unit: $120 to $700+
- Typical installation labor: $150 to $450
- Complete replacement with plumbing or electrical upgrades: $300 to $1,100+
These are general ranges to set expectations; actual costs depend on the model chosen and site conditions.
Maintenance tips to extend service life
- Run cold water while grinding and for 15 seconds after to flush particles.
- Avoid grease, coffee grounds, fibrous foods (corn husks, celery), bones, and non-food items.
- Periodically grind ice cubes and citrus peels to clean and refresh blades.
- If your home has hard water, consider periodic inspections for mineral buildup.
- Know where the reset button and circuit breaker are; never place hands inside the grind chamber.
Expert Garbage Disposal Installation in Dupont, CO
Simplify your kitchen cleanup with Garbage Disposal Installation in Dupont, CO by Limelight Services. Our professionals install durable, high-performance disposals designed for everyday use. We ensure safe connections and smooth operation for years of reliable service. Review our Services, take advantage of seasonal promotions, and contact us for your installation quote. Limelight Services helps make your kitchen more efficient and environmentally friendly with expert disposal installations done right the first time.
Customer Testimonials


Robert was very friendly, professional and efficient troubleshooting and repairing our electrical issues. Thank you so much for getting everything fixed in a timely and efficient manner! We greatly appreciate your services and highly recommend Robert and his company!!

Since moving to Colorado 7 years ago this was without a doubt my best contractor experience. A clean and expert job quickly accomplished at a great price for the quality. Jason's number has firmly made it into my phone book, and will be my electrician of choice from now on!
Limelight’s prices are the best in northern CO and so is the work.The job was done professionally and quickly. We had no problems and are veryhappy with the quality of the work!
Limelight's prices are the best in northern CO and so is the work. The job was done professionally and quickly. We had no problems and are very happy with the quality of the work!
Jason was by far my best experience within all my contractors. And, I was very impressed by the speed in which he did his job.